 README
README
CDN Proxy
![]()
![]()
A tool that can be used by web app pentesters to create a copy of the targeted website with CDN and WAF restrictions disabled.
Related Blog Post: Bypassing CDN WAF’s with Alternate Domain Routing .
Note: If you find this project useful, would like it improved, and want to sponsor further development of it ping me at me@ryanjarv.sh. Below are a few ideas:
- Support for other SaaS products that can act as non-conventional proxies.
- IaC setup for deploying automated scanning of your own infrastructure.
- Improved support, documentation, and ease of use for web app pentesters.
Table of Contents
This repo contains three seperate tools for different tasks, these are listed below.
- CDN Proxy -- Automates deployment of infrastructure.
- CDN Scanner -- Scanner to discover affected origins.
- Burp Suite Extension -- Allows you to browse affected origins via a local browser.
Overview
cdn-proxy is a set of tools for bypassing IP allow listing intended to restrict origin access to requests originating from shared CDNs.
Bypassing protections at the CDN layer through direct access is well documented, however a common response to prevent the issue is to set up IP allow listing from the CDNs shared network range. Because shared CDNs use a common pool of IPs for origin requests these IP restrictions can be bypassed by routing traffic through a second attacker controlled distribution on the same network.
When configuration of this second (proxy) distribution is controlled by the attacker requests are not subject to the same security requirements as the intended distribution. WAFs, ratelimiting, filtering, and any authentication implemented in the intended distribution will not apply for requests passing through the proxy distribution.
Requests passing through the distribution may also be controlled by the attacker to some extend, however this depends largely on configuration options available. In the case of CloudFront some parts of the request as well as the intended origin can be controlled by code in a Lambda@Edge function, this allows for controlling the X-Forwarded-For header potentially allowing for IPs to be spoofed in the backend web app as well as quickly scanning a large number of origins to determine if they are susceptible to this attack.

https://user-images.githubusercontent.com/4079939/130310987-3ad7e7b4-db7f-4a6e-b511-14ef7a9dbab4.mov
Prerequisites
- CloudFlare or CloudFront is used to filter or restrict traffic.
- This likely applies to other CDNs as well, this is just what is supported currently.
- You know the origin (backend) IP.
- cdn-scanner can be used to find origins which are only accessible through the CDN network.
- The origin allows access from the Shared IP range used by the CDN network.
Additionally, in the case of CloudFlare, the origin web app needs to use a default virtual host to serve the website. This is because it is not possible to set the Host header arbitrarily on requests to the origin. It should be possible to perform this attack when this is not the case when you have access to a Enterprise CloudFlare account however this is not supported by cdn-proxy currently. To do this manually you need to ensure the CloudFlare configuration correctly sets the host header as the request passes through the CloudFlare network.
cdn-proxy
Installation
Note: At the moment the PyPi version is not the latest version and may not work for you. I'll fix this soon, in the mean time you can install/update directly from the GitHub repo.
pip3 install -U git+https://github.com/RyanJarv/cdn-proxy.git@main
cdn-proxy --help
Usage
The structure for cdn-proxy commands is cdn-proxy <cloudfront|cloudflare> <create|delete> where:
The exact process and required options is different between providers, refer to the provider sections below for more details.
CloudFront
Usage
cdn-proxy cloudfront -h
Usage: cdn-proxy cloudfront [OPTIONS] COMMAND [ARGS]...

  Manage CloudFront distributions

Options:
  --region REGION    Sets the AWS region.  [default: us-east-1]
  --profile PROFILE  Shared credential profile to use.
  -h, --help         Show this message and exit.

Commands:
  create  Create a new CloudFront distribution and Lambda@Edge function...
  delete  Disable and delete the specified distribution.
  status  Get the status of the CloudFront deployment.
Overview
The CloudFront module will set up the distribution that acts as a proxy through CloudFront. It is not necessary to specify a target when using CloudFront and more then one target can be used with the same distribution. This is because the origin and host header can be set dynamically per request by setting the Cdn-Proxy-Origin and Cdn-Proxy-Host headers in the client request to the CDN. The X-Forwarded-For header will also be passed through from the client, if this isn't set it will default to a random IP address in the request to the origin which will allow bypassing app side IP ratelimiting in some cases.
After deploying the CloudFront configuration with cdn-proxy cloudfront create you can navigate to the distribution to find
a help page with more info on headers to control the request as well as some examples.
In addition to making requests manually with curl you can use the CDN Proxy's Burp Suite Extension to proxy all Burp requests through the CloudFront proxy. Among other things this allows you to browse any sites only exposed to CloudFront IPs like you normally would through the built in Burp browser.
To scan for origin IPs which only allow requests through the CDN network you can use cdn-scanner or the (less-featured) web based scanner which is hosted at the CloudFront distribution domain name. You will find this domain name in the output of cdn-proxy after creating the distribution.
Using curl to make a request to a specific origin can be done with the following:
curl -H 'Cdn-Proxy-Origin: Origin_IP' Distribution_Domain_Name
Where "Origin_IP" is the target origin IP and "Distribution_Domain_Name" is the domain name of the CloudFront distribution
created with the cdn-proxy cloudfront create command. The domain name can also be found by running cdn-proxy cloudfront status.
More curl examples can be found at the end of this subcommand section.
On the backend CloudFront requires domain names for origins, to work around this the Lambda@Edge function associated with the
distribution that sets the origin dynamically will convert IP address's it finds in the Cdn-Proxy-Origin header to an equivalant
sslip.io subdomain. The sslip.io subdomain will be in the format of 1-1-1-1.sslip.io and will map to the corresponding IP,
effectively allowing us to use IPs when CloudFront only accepts domain names. This all happens transparently and is mentioned
here for informational purposes.
The CloudFront module also is fairly slow and may take a while to set up and tear down, you however can reuse the same
distribution for any target by changing the Cdn-Proxy-Origin header.
Headers
- Cdn-Proxy-Origin
- This header is Required and needs to be set to the origin the request should be routed to after passing through CloudFront. You can set this to a hostname or an IP, however because CloudFront only supports hostnames for origins any IP will be replaced with the equivalent domain using sslip.io.
- Cdn-Proxy-Host
- The value of the Host header in the request to the origin. This header is optional but recommended. If not set it will default to the value of Cdn-Proxy-Origin.
- X-Forwarded-For
- Passed through to the origin if set (like most other non-listed headers). If this header is not set it defaults to a randomized IP address in the request to the origin. This allows for bypassing IP based rate limiting in the backend in some cases.
- You may also want to try setting this to trusted values such as 127.0.0.1 or another internal IP address to expose any administrative or debug pages restricted by IP in the web application (compared to restrictions enforced in CloudFront/WAF, which will already be disabled when using this proxy).
- Multiple caching proxies are sometimes used in front of the origin, say CloudFront routes to Varnish which routes to nginx. In cases like this, where you are using the nginx service as the origin, you may need to set the target IP you want to add multiple IPs to this header with the one you want to spoof on the far left (example: X-Forwarded-For: 127.0.0.1, 172.32.10.10). It's also possible the second IP here needs to be a trusted IP on the internal network of the origin.
Curl -- No Host Header Example
Here we are simply forwarding to the public ifconfig.me service after the request passes through CloudFront. The IP returned will be the source IP our request made from the CloudFront network. We don't need to set Cdn-Proxy-Host because ifconfig.me responds the same regardless of what the host header is set to.
curl -H 'Cdn-Proxy-Origin: ifconfig.me' -H 'Cdn-Proxy-Host: ifconfig.me' XXXXXXXXXXXXX.cloudfront.net
Curl -- EC2 Origin Example
More likely you'll be running something like this, where Cdn-Proxy-Origin is a specific backend server and Cdn-Proxy-Host is the domain name of the website it is running. If Cdn-Proxy-Host is not set correctly you may not be able to reach the site, but this depends on the server configuration.
curl -H 'Cdn-Proxy-Origin: ec2-XX-XX-XX-XX.us-west-2.compute.amazonaws.com' -H 'Cdn-Proxy-Host: example.com' XXXXXXXXXXXXX.cloudfront.net
CloudFlare
Usage
Usage: cdn_proxy cloudflare [OPTIONS] COMMAND [ARGS]...

  Manage CloudFlare distributions

Options:
  --token REGION      Sets the AWS region.  [required]
  --zone-name REGION  Sets the AWS region.  [required]
  --help              Show this message and exit.

Commands:
  create  Create a new CloudFront distribution and Lambda@Edge function...
  delete  Disable and delete the specified distribution.
  list    List CloudFront distributions IDs and targets created with...
  scan    HTTP scan of IP's both directly and via proxy...
Overview
Warning: Please do not use this on a production domain.
The CloudFlare subcommand of cdn-proxy is a fair bit simpler then the cloudfront subcommand as it is only used for adding, removing, and listing proxied DNS records in an already existing domain. It can not create this domain for you and you can not specify targets dynamically.
This requires an existing domain to already be created in CloudFront, this is because CloudFlare will not assign a temporary domain to you like CloudFront does. The domain needs to be registered and active, but should be a spare domain only used for cdn-proxy. You will also want to disable all security features on this domain so they do not apply to requests passing through it.
Caveats
One shortcoming of this module is that it does not set the host header to the target domain after the request passes through the CDN. This means this module will only be effective on origins that do not have a default virtual host set up hosting the website you're targeting. Setting the host header in the client request will not work as expected since this will cause the request to be routed to a different CloudFront configuration.
You can work around this limitation if you have an enterprise CloudFlare account. This however is not handled by cdn-proxy currently, but you can configure this manually using a transform rule in your zone configuration. If you want to see support for this added to cdn-proxy let us know in a GitHub issue.
A second limitation is you can not fully control the X-Forwarded-For header in the request to the origin. CloudFlare treats this as a protected header.
CDN Scanner
Q: Why is this split up into another app? Why not include this functionality in the cdn-proxy python script?
A: The scanner actually was originally written in python and added as a subcommand in cdn-proxy. Python parallelisim and asyncio got the best of me however and this was all rewritten in a session of anger driven development. Now that it is written in GoLang, in a way that actually makes sense, it is ...much... faster then it was before. Client speed is pretty usefull when using CloudFront, this is because we can really send requests as fast as CloudFront will handle them.. which should be pretty fast.
It is worth noting that the python version being slow had more to do with my lack of knowledge around writing fast/concurrent/async python code then python itself, although I'm sure both helped here quite a bit.
Installation
GOPRIVATE=github.com/RyanJarv/cdn-proxy go install github.com/RyanJarv/cdn-proxy
mv ~/go/bin/cdn-{proxy,scanner}
export PATH=$PATH:~/go/bin
cdn-scanner -h
Usage
Usage of cdn-scanner: /var/folders/t6/z_k2wx1j3dbcf83ym91bspf40000gr/T/go-build1086559817/b001/exe/main [-domain string] [-report string] [-workers int] <cloudfront|cloudflare> [args...] <IP/CIDR/Path to File> ...
  -domain string
    	The domain to route requests through, fetched from AWS if not specified.
  -report string
    	JSON report file output location.
  -workers int
    	Maximum number of workers used to make requests, defaults to 100. (default 100)

Sub Commands
	cloudfront [IP/Hostname/CIDR/file path] ...

		  -profile string
		    	Proxy domain AWS Profile, not used if -proxyDomain is passed.
		  -region string
		    	Proxy domain AWS Region, not used if -proxyDomain is passed
        cloudflare  [IP/Hostname/CIDR/file path] ...
Scanner Overview
The cloudflare or cloudfront subcommands both take a list of IPs, Hostnames, CIDRs or optionally files which in turn should contain a list of additional IPs, Hostnames, or CIDRs. Each network asset is then scanned, once for http and once for https, both directly as well as proxied through the CDN specified, the responses are then compared to determine whether IP allow listing is in effect for the asset.
For example, if the TCP connection for direct http request responds is closed by the remote host and the request when proxied through the CDN responds with a 200 then this would indicate IP allow listing is used on the scanned asset.
Example output
http://1.2.3.4 -- Both: open (200)
https://1.2.3.5 -- Via Proxy: filtered (504), Origin: closed (0)
In the output above the first line indicates that port 80 (http) at the address 1.2.3.4 is accessible both from the scanners current IP as well as from the source IP of the CDN used.
The second line indicates that port 443 (https) at the address 1.2.3.5 was filtered (did not respond) when accessed through the proxy and when accessed directly the remote closed (remote rejected the connection) the connection.
The status (open/closed/filtered) when for the proxied request is determined by the HTTP status code returned by the CDN the request was proxied through. Typically CDNs will have different 5XX error codes for various failure conditions which should allow you to determine if the remote rejected the connection, didn't respond, or timed out in some other way. Worth keeping in mind that associating these HTTP status codes with the correct state is a work in progress currently.
Generally the interesting results you likely want to look for will be when the proxied request returns a 2XX status code and the direct request either is closed, filtered, or denied access (403). This very likely means there is IP allow listing in place on the origin and that you can bypass this by routing requests through a distribution you control in the CDN.
CloudFront Scanner
The cloudfront subcommand assumes the value passed with -domain is a cloudfront distribution set up with cdn-proxy. If -domain is not passed then cdn-scanner will attempt to look for a CloudFront distribution in the current account created by cdn-proxy. The origin configuration is set dynamically for each request, making the CloudFront scanner much faster then the cloudflare one.
CloudFlare Scanner
Note: Access keys need are assumed to be in the environment variables CLOUDFLARE_API_KEY and CLOUDFLARE_API_EMAIL.
The CloudFlare scanner works a bit differently, it does not necessarily need anything set up by cdn-proxy. This scanner only needs access to a spare CloudFlare zone. Please use a spare, rather then risking running this on any important domain.
Each network address first adds a proxied DNS subdomain to the zone passed in the -domain option. It then makes a request to the recently created subdomain as well as to the network address directly comparing the two responses.
After some time the subdomains will start getting reused, because it's difficult to know exactly when a change to the CloudFlare API has gone into effect it is necessary to peform several steps which slow this scan down quite a bit. First the subdomain that will be rotated is deleted from CloudFlare and we wait for either CloudFlare to start returning the appropriate error message or for DNS to fail. Once the subdomain has successfully been deleted it is then created again withh the new updated record. The proxied request then can be served once the subdomain is observed to start working again. So far this has been the most reilable method found, without these steps the results eventually become out of sync with the state the CloudFlare network was in when the request is made. This typically doesn't happen at first, but rather after the scan has run for some time suggesting that the CloudFlare API may start queing requests for individual users after some threshold.
Burp Suite Extension
The Burp Suite extension script can be used to proxy traffic through a CloudFront proxy created with cdn-proxy.
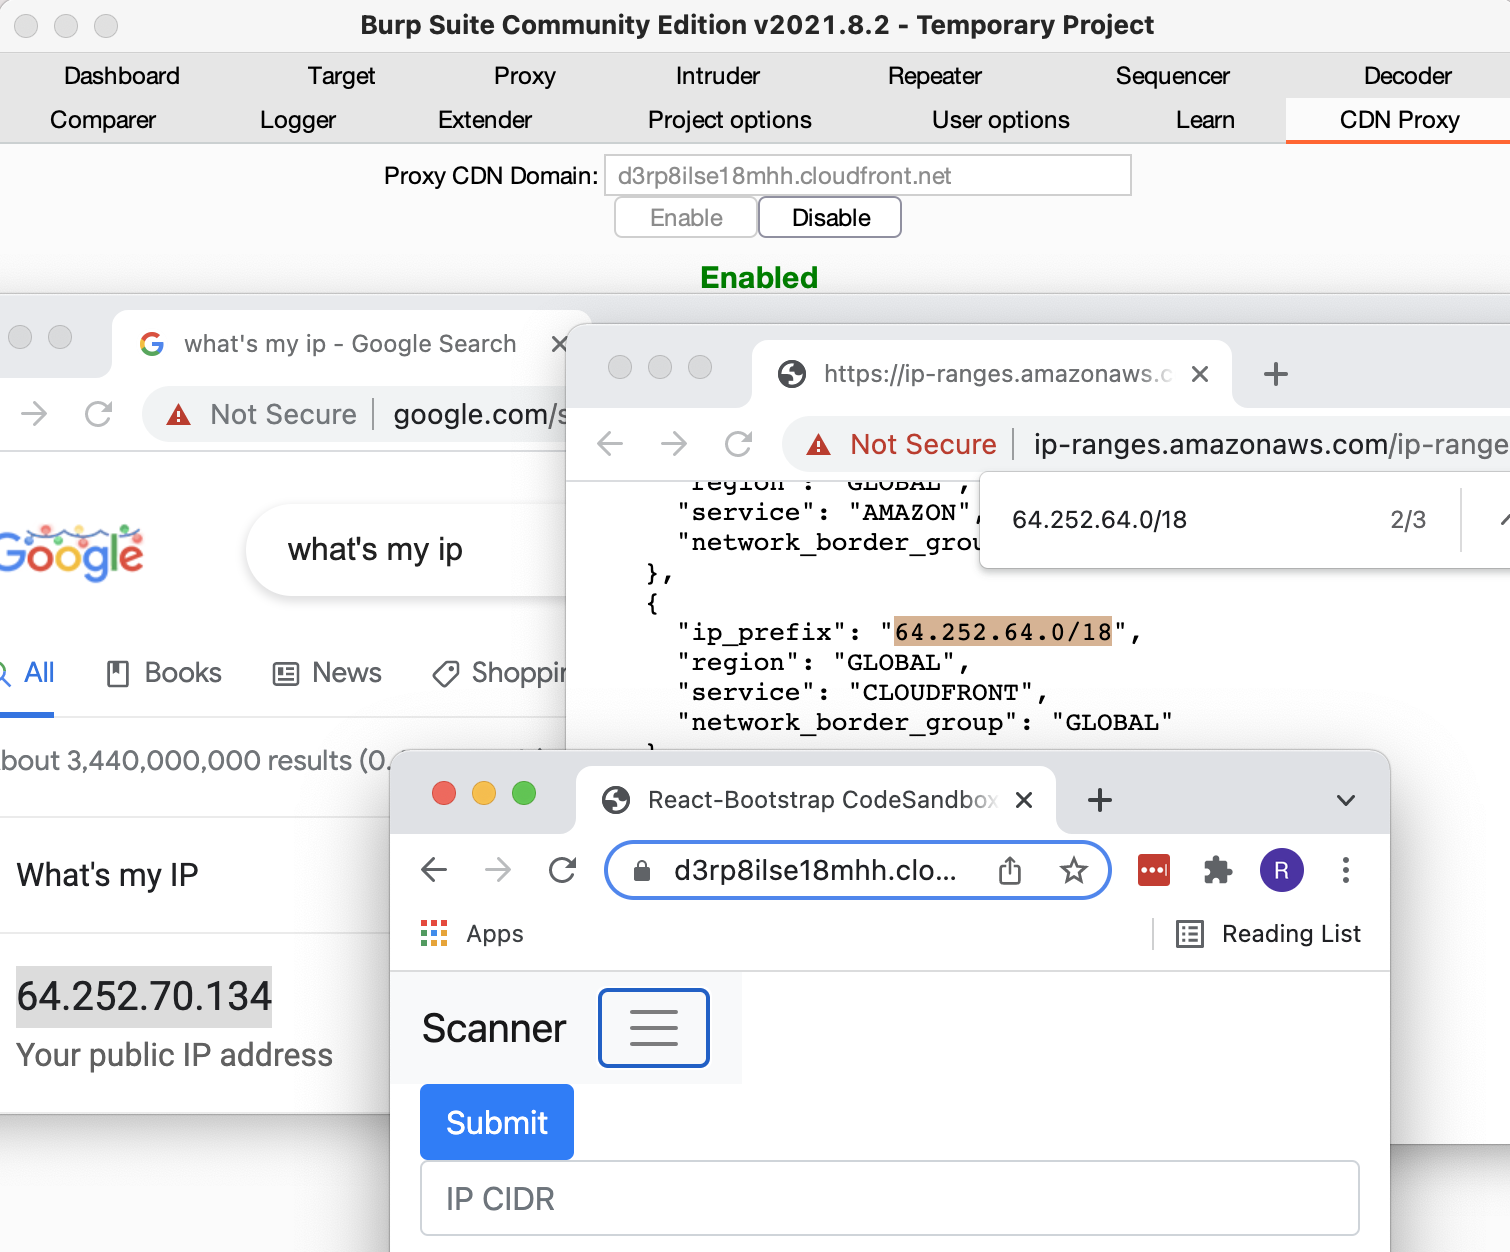
The image above shows using the aws-proxy Burp Plugin and Burp's Builtin Chromium browser to proxy traffic through the CloudFront CDN. The IP that shows up in the
left browser (64.252.70.134) is what Google's servers think the IP address of the client is. This IP of course is actually one of the many shared
IPs used by CloudFront to make requests to backend servers, you can verify this by checking Amazon's ip-ranges.json and checking the IP falls in a CIDR range of the CloudFront service. In this case it does specifically for the 64.252.64.0/18 CIDR range, which
is shown in the browser on the right. The third window is a non-proxied browser viewing the distribution shown in the Burp plugin window.
Installation
git clone https://github.com/RyanJarv/cdn-proxy.git
cd cdn-proxy/burp_extension
python3 -m venv venv
source venv/bin/activate
pip3 install -r requirements.txt
In Burp Extender under the Options tab:
- Make sure the Jython jar location is specified under the Python Environment section.
- In the same section set
Folder for loading modulesto<location of git repo>/burp_extension/venv/lib/python3.9/site-packages
In Burp Extender under the Extensions tab:
- Click
Add - set
Extension typeto python - Use
Select file...to load cdn_proxy_burp_ext.py - Click
Next
In the new CDN Proxy tab that shows up, set the Proxy Host field to the domain of the distribution created with
cdn-proxy cloudflare create. Traffic from Burp will now be routed through the CloudFront proxy.
Support
Please open an issue for support.
Contributing
Please contribute using Github Flow. Create a branch, add commits, and open a pull request.
 Documentation
Documentation

There is no documentation for this package.