 README
README
arduino-create-agent
Installation
Get the latest version of the Agent for all supported platforms:
Windows
MacOSX
Linux
arduino-create-agent is a fork of @johnlauer's serial-port-json-server (which we really want to thank for his kindness and great work)
The history has been rewritten to keep the repo small (thus removing all binaries committed in the past)
Using multiple configurations
The agent supports multiple configuration files. When multiple configurations are found by the agent, the tray icon menu is expanded to contain the different configurations:
![]()
The default config.ini file contains common configurations, every other config file inherit from it.
To create multiple configuration files:
- stop the agent: tray bar icon -> pause then tray bar icon -> kill
- find the
config.inifile that is present in thearduino-create-agentinstallation folder - copy
config.inior create a new ini file (e.g.example.ini) with content:
add in this file other configuration options (you can override inherited values fromname = your configuration nameconfig.ini) - restart the agent
- click the tray bar icon and select the new configuration
Tip: you can also use the multiple configurations feature to create a new configuration with the proxy settings. This way you can have multiple proxies configured and disable proxy configuration with ease.
When behind a proxy
The agent supports working behind a proxy, but manual configuration is required (there is no support for automatic proxy discovery).
To add proxy configuration:
- stop the agent: tray bar icon -> pause then tray bar icon -> kill
- find the
config.inifile that is present in thearduino-create-agentinstallation folder - copy
config.inito a new file (e.g.proxy.ini) with content:name = Proxy Enabled [env] http_proxy=your.proxy.here https_proxy=your.https.proxyhere - please note spaces are not allowed before and after the string
http_proxy - restart the agent
- select the proper Proxy profile as in the image
- your agent will now work behind a proxy
![]()
Disable Autostart
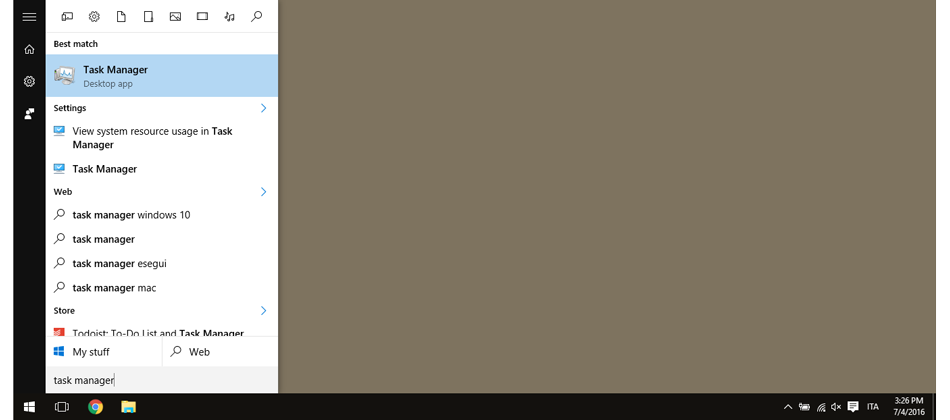
Windows
- Type "Task Manager in the Windows Search Bar"
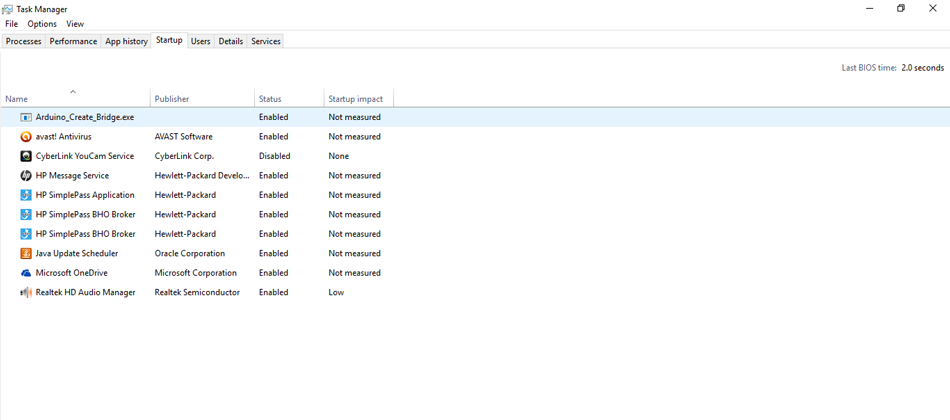
 2. Select the Startup tab
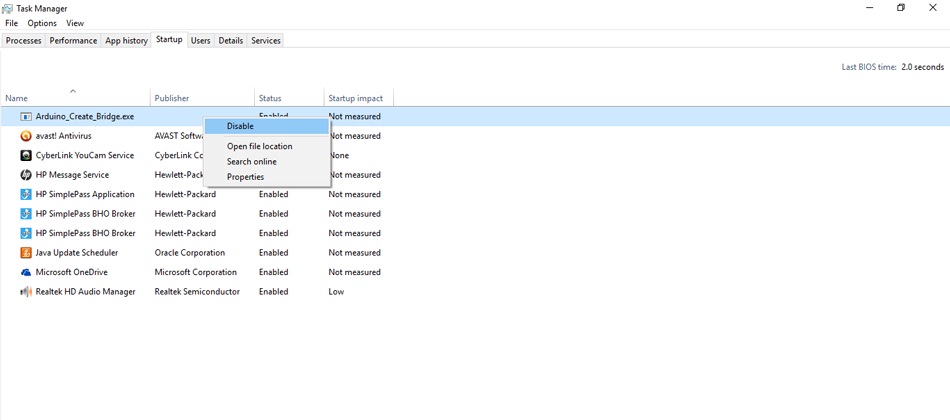
 3. Select the autostart file
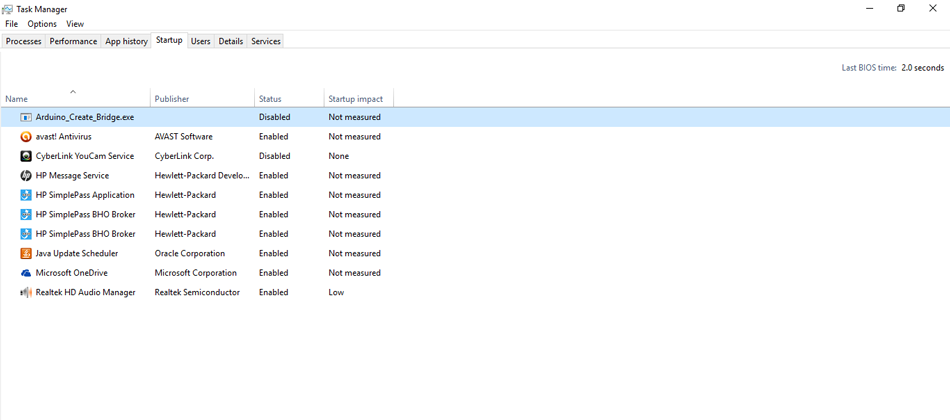
 4. Disable it
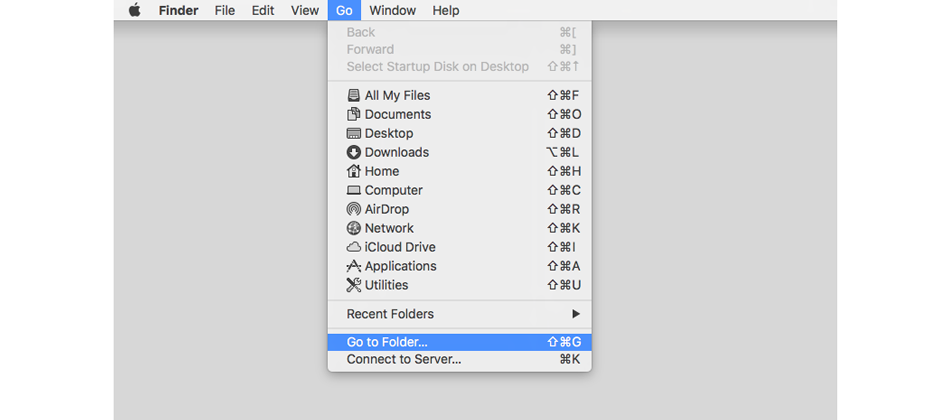
Mac OSX
- Open Finder, click on Go menu, select 'Go to Folder'
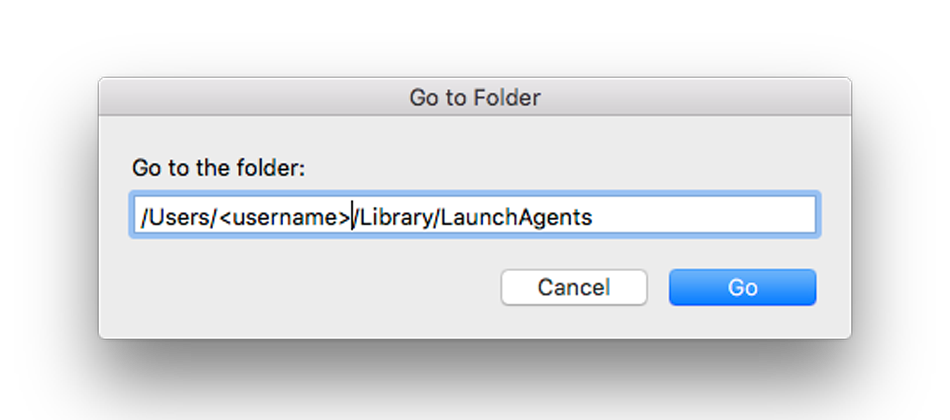
 2. Type the directory containing the autolauncher file, change with your Mac username, by default the directory is /Users/username/Library/LaunchAgents
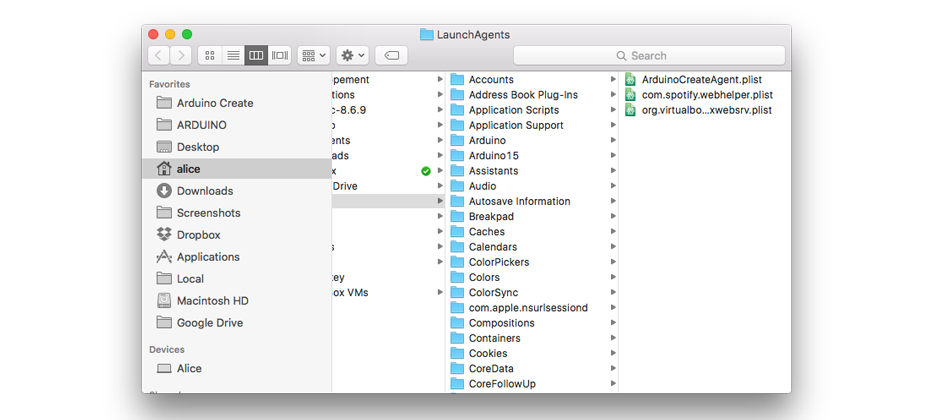
 3. Select the ArduinoCreateAgent.plist file
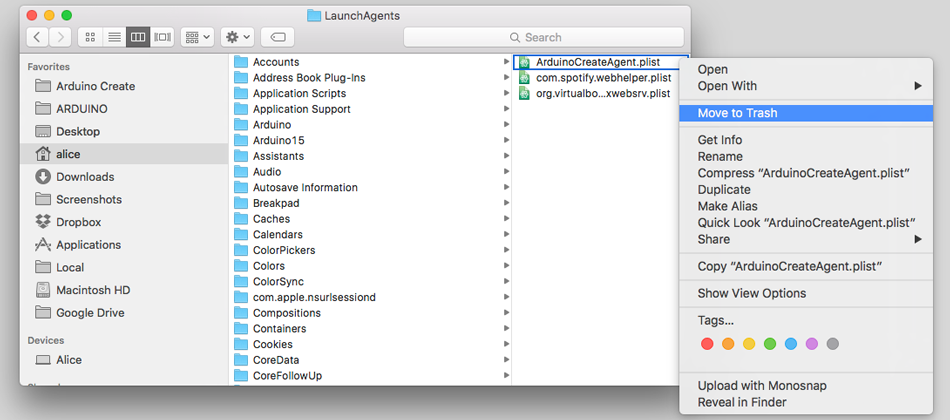
 4. Right click on the file name and select 'Move to Trash'
The command line way:
$ launchctl unload ~/Library/LaunchAgents/ArduinoCreateAgent.plist
Linux
- Show hidden files
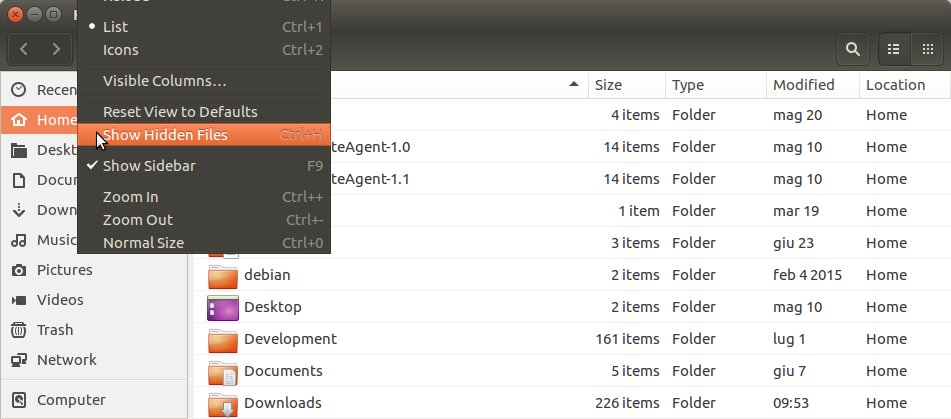 2. Select the .config dir in your home
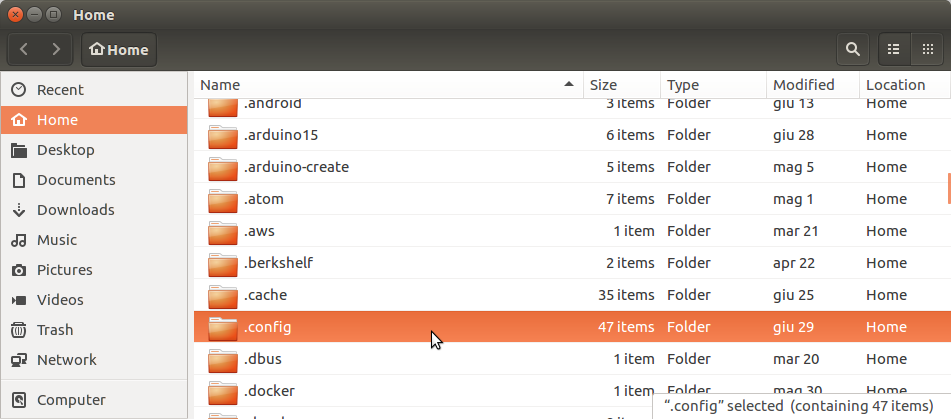 3. Select the autostart dir
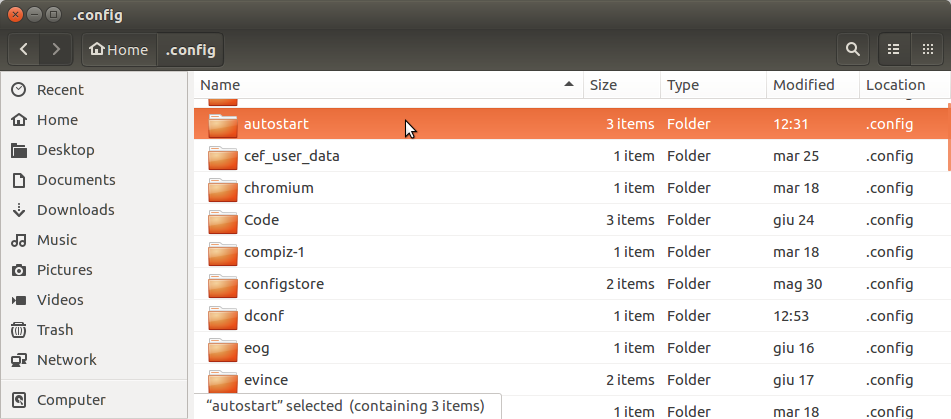 4. Move the file to the trash
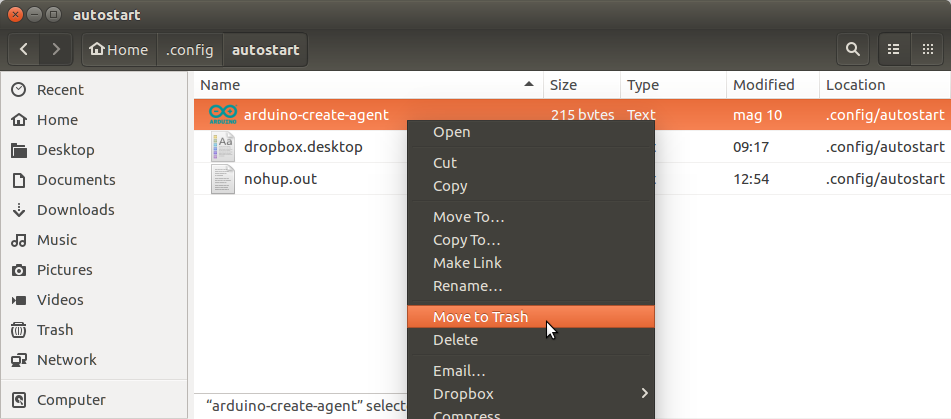
The command line way:
Just remove the autostart file in your desktop manager, in Ubuntu is:
$ rm $HOME/.config/autostart/arduino-create-agent.desktop
To start manually the agent you can open the file at:
$ nohup $HOME/ArduinoCreateAgent-1.1/Arduino_Create_Bridge &
or in the location selected during the installation
Contributing
Please use the current latest version:
Windows
MacOSX
Linux
How to use it
The arduino create agent is a single binary that reads from a configuration file. Upon launching it will sit on the traybar and work in the background.
It will listen to http and websocket connections on a range of ports from 8990 to 9000.
Discover the port
You should make GET request to the /info endpoint on the possible ports, until you find a reply:
$ curl http://127.0.0.1:8990/info
curl: (7) Failed to connect to 127.0.0.1 port 8990: Connection refused
$ curl http://127.0.0.1:8991/info

$ curl http://127.0.0.1:8992/info
{"http":"http://127.0.0.1:8992","https":"https://127.0.0.1:8991","version":"1.0.36","ws":"ws://127.0.0.1:8992","wss":"wss://127.0.0.1:8991"}
The reply will contain a json with info about the version and the http and https endpoints to use
Open a websocket
Most of the commands can be performed with websocket instructions. We use a library called socket.io to handle the messages. Once you have the websocket endpoint you need you can:
var socket = io(endpoint);
socket.on('connect', function () {
    socket.emit('command', yourCommand);

    socket.on('command', function () {
        // Your code to handle messages
    })
}
Use the debug console
By clicking on the tray icon and going to the debug console you can try most of the websocket commands. The first command you should type in is:
log on
List the boards
To get a json list of the connected boards you can issue the command:
list
You will receive an object of all the boards connected with USB or over the network:
{
  "Ports":[
    {
      "Name":"/dev/ttyACM0",
      "SerialNumber":"",
      "DeviceClass":"",
      "IsOpen":false,
      "IsPrimary":false,
      "Baud":0,
      "BufferAlgorithm":"",
      "Ver":"1.0.36",
      "NetworkPort":false,
      "VendorID":"0x2341",
      "ProductID":"0x8036"
    }
  ],
  "Network":false
}{
  "Ports":[
    {
      "Name":"192.168.1.101",
      "SerialNumber":"",
      "DeviceClass":"",
      "IsOpen":false,
      "IsPrimary":false,
      "Baud":0,
      "BufferAlgorithm":"",
      "Ver":"1.0.36",
      "NetworkPort":true,
      "VendorID":"board=Arduino Y\\195\\186n Shield distro_version=0.1",
      "ProductID":"Shield"
    }
  ],
  "Network":true
}
Open/Close ports
To read input from a board connected to USB you must first open the port with the command
open /dev/ttyACM0 9600
where you should replace /dev/ttyACM0 with the actual port and 9600 with the baud.
You will receive a message like:
{
  "Cmd":"Open",
  "Desc":"Got register/open on port.",
  "Port":"/dev/ttyACM0",
  "IsPrimary":true,
  "Baud":9600,
  "BufferType":""
}
or
{
  "Cmd":"OpenFail",
  "Desc":"Error opening port. Serial port busy",
  "Port":"/dev/ttyACM0",
  "Baud":9600
}
You can then close the port with
close /dev/ttyACM0
You will receive a message like:
{
  "Cmd":"Close",
  "Desc":"Got unregister/close on port.",
  "Port":"/dev/ttyACM0",
  "Baud":9600
}
or
{
  "Error":"We could not find the serial port /dev/ttyACM0 that you were trying to close."
}
Receiving and sending data
While a port is open you can send input with
send /dev/ttyACM0 hello
with a reply like
{"Cmd":"Queued","QCnt":1,"Ids":[""],"D":["hello"],"Port":"/dev/ttyACM0"}
{"Cmd":"Write","QCnt":0,"Id":"","P":"/dev/ttyACM0"}
{"Cmd":"CompleteFake","Id":"","P":"/dev/ttyACM0"}
You can receive output from the serial port by listening to messages like this:
{
  "D":"output string\r\n"
}
Download a tool
You can download a tool on the computer with a command like
downloadtool avrdude 6.0.1-arduino5 replace
receiving a reply like
{
  "DownloadStatus": "Success",
  "Msg":"Map Updated"
}
The syntax of the command is:
downloadtool {{name}} {{version}} {{behaviour}}
where version can be a version number of the string "latest", and behaviour can be
"keep" (which skips the download if the tool already exists) and "replace" (which will download it again).
Upload
You can upload a binary sketch to a board connected to a port with a POST request to be made at the http endpoint.
The payload is a json object that looks like this:
{
  "board":"arduino:avr:leonardo",
  "port":"/dev/ttyACM1",
  "commandline":"\"{runtime.tools.avrdude.path}/bin/avrdude\" \"-C{runtime.tools.avrdude.path}/etc/avrdude.conf\" {upload.verbose} -patmega32u4 -cavr109 -P{serial.port} -b57600 -D \"-Uflash:w:{build.path}/{build.project_name}.hex:i\"",
  "signature":"97db97ced2c",
  "hex":"OjEwMDAwMDAwMEM5NEU1MDAwQzk0MEQwMTBDOTQwRDAxMEM5NDBEMDE2MQ0KOjEwMDAxMDAwMEM5NDBEMDEwQzk0M",
  "filename":"Blink.ino.hex",
  "extrafiles": [],
  "extra":{
    "auth":{
      "username":null,
      "password":null,
      "private_key":null,
      "port":null
    },
    "wait_for_upload_port":true,
    "use_1200bps_touch":true,
    "network":false,
    "params_verbose":"-v",
    "params_quiet":"-q -q",
    "verbose":true
  }
}
-
commandline is the command to execute to perform the upload. This is, for example, avrdude on a Leonardo.
-
hex contains the sketch hex encoded in base64
-
signature is the signature of the commandline signed with the private key that matches the public key contained in the config.ini of the arduino-create-agent
The results of the upload will be delivered via websocket with messages that look like:
{"Msg":"avrdude: verifying ...","ProgrammerStatus":"Busy"}
{"Msg":"avrdude done. Thank you.","ProgrammerStatus":"Busy"}
{"Flash":"Ok","ProgrammerStatus":"Done"}
Development
Please remember that for compile the project, you need go version <= 1.8.7 (more recent versions are not supported for compile)
To clone the repository, run the following command:
go get github.com/arduino/arduino-create-agent
This will clone the repository into your Go workspace or create a new workspace, if one doesn't exist. You can set $GOPATH to define where your Go workspace is located.
Now you can go to the project directory and compile it:
cd $GOPATH/src/github.com/arduino/arduino-create-agent
go build
This will create the arduino-create-agent binary.
Other prerequisites are:
- libappindicator (Linux only on Ubuntu
sudo apt-get install libappindicator1) - [go-selfupdate] (https://github.com/sanbornm/go-selfupdate) if you want to test automatic updates
Submitting an issue
Please attach the output of the commands running at the debug console if useful.
Submitting a pull request
We are glad you want to contribute with code: that's the best way to help this software.
Your contribution is adding or modifying existing behaviour, please always refer to an existing issue or open a new one before contributing. We are trying to use Test Driven Development in the near future: please add one or more tests that prove that your contribution is good and is working as expected, it will help us a lot.
Be sure to use go vet and go fmt on every file before each commit: it ensures your code is properly formatted.
Also, for your contribution to be accepted, every one of your commits must be "Signed-off". This is done by committing using this command: git commit --signoff
By signing off your commits, you agree to the following agreement, also known as Developer Certificate of Origin: it assures everyone that the code you're submitting is yours or that you have rights to submit it.
Developer Certificate of Origin
Version 1.1

Copyright (C) 2004, 2006 The Linux Foundation and its contributors.
660 York Street, Suite 102,
San Francisco, CA 94110 USA

Everyone is permitted to copy and distribute verbatim copies of this
license document, but changing it is not allowed.


Developer's Certificate of Origin 1.1

By making a contribution to this project, I certify that:

(a) The contribution was created in whole or in part by me and I
    have the right to submit it under the open source license
    indicated in the file; or

(b) The contribution is based upon previous work that, to the best
    of my knowledge, is covered under an appropriate open source
    license and I have the right under that license to submit that
    work with modifications, whether created in whole or in part
    by me, under the same open source license (unless I am
    permitted to submit under a different license), as indicated
    in the file; or

(c) The contribution was provided directly to me by some other
    person who certified (a), (b) or (c) and I have not modified
    it.

(d) I understand and agree that this project and the contribution
    are public and that a record of the contribution (including all
    personal information I submit with it, including my sign-off) is
    maintained indefinitely and may be redistributed consistent with
    this project or the open source license(s) involved.
Creating a release
Just create a new release on GitHub, and our drone server will build and upload the compiled binaries for every architecture in a zip file in the release itself.
 Documentation
Documentation

There is no documentation for this package.
 Source Files
Source Files
 Directories
Directories
| Path | Synopsis |
|---|---|
|
Package upload allows to upload sketches into a board connected to the computer It can do it via serial port or via network **Usage for a serial upload** Make sure that you have a compiled sketch somewhere on your disk “`go commandline = “"/usr/bin/avrdude" "-C/usr/bin/avrdude.conf" -v -patmega32u4 -cavr109 -P/dev/ttyACM0 -b57600 -D "-Uflash:w:./sketch.hex:i"“ err := upload.Serial("/dev/ttyACM0", commandline, upload.Extra{}, nil) “` note that the commandline contains the path of the sketch (sketch.hex) **Usage for a network upload** Make sure that you have a compiled sketch somewhere on your disk “`go err := upload.Network("127.0.10.120", "arduino:avr:yun, "./sketch.hex", "", upload.Auth{}, nil) “` The commandline can be empty or it can contain instructions (depends on the board) **Resolving commandlines** If you happen to have an unresolved commandline (full of {} parameters) you can resolve it “`go t := tools.Tools{} commandline = upload.Resolve("/dev/ttyACM0", "arduino:avr:leonardo", "./sketch.hex", commandline, upload.Extra{}, t) “` t must implement the locater interface (the Tools package does!) **Logging** If you're interested in the output of the commands, you can implement the logger interface.
|
Package upload allows to upload sketches into a board connected to the computer It can do it via serial port or via network **Usage for a serial upload** Make sure that you have a compiled sketch somewhere on your disk “`go commandline = “"/usr/bin/avrdude" "-C/usr/bin/avrdude.conf" -v -patmega32u4 -cavr109 -P/dev/ttyACM0 -b57600 -D "-Uflash:w:./sketch.hex:i"“ err := upload.Serial("/dev/ttyACM0", commandline, upload.Extra{}, nil) “` note that the commandline contains the path of the sketch (sketch.hex) **Usage for a network upload** Make sure that you have a compiled sketch somewhere on your disk “`go err := upload.Network("127.0.10.120", "arduino:avr:yun, "./sketch.hex", "", upload.Auth{}, nil) “` The commandline can be empty or it can contain instructions (depends on the board) **Resolving commandlines** If you happen to have an unresolved commandline (full of {} parameters) you can resolve it “`go t := tools.Tools{} commandline = upload.Resolve("/dev/ttyACM0", "arduino:avr:leonardo", "./sketch.hex", commandline, upload.Extra{}, t) “` t must implement the locater interface (the Tools package does!) **Logging** If you're interested in the output of the commands, you can implement the logger interface. |