 README
README
![]()
![]()


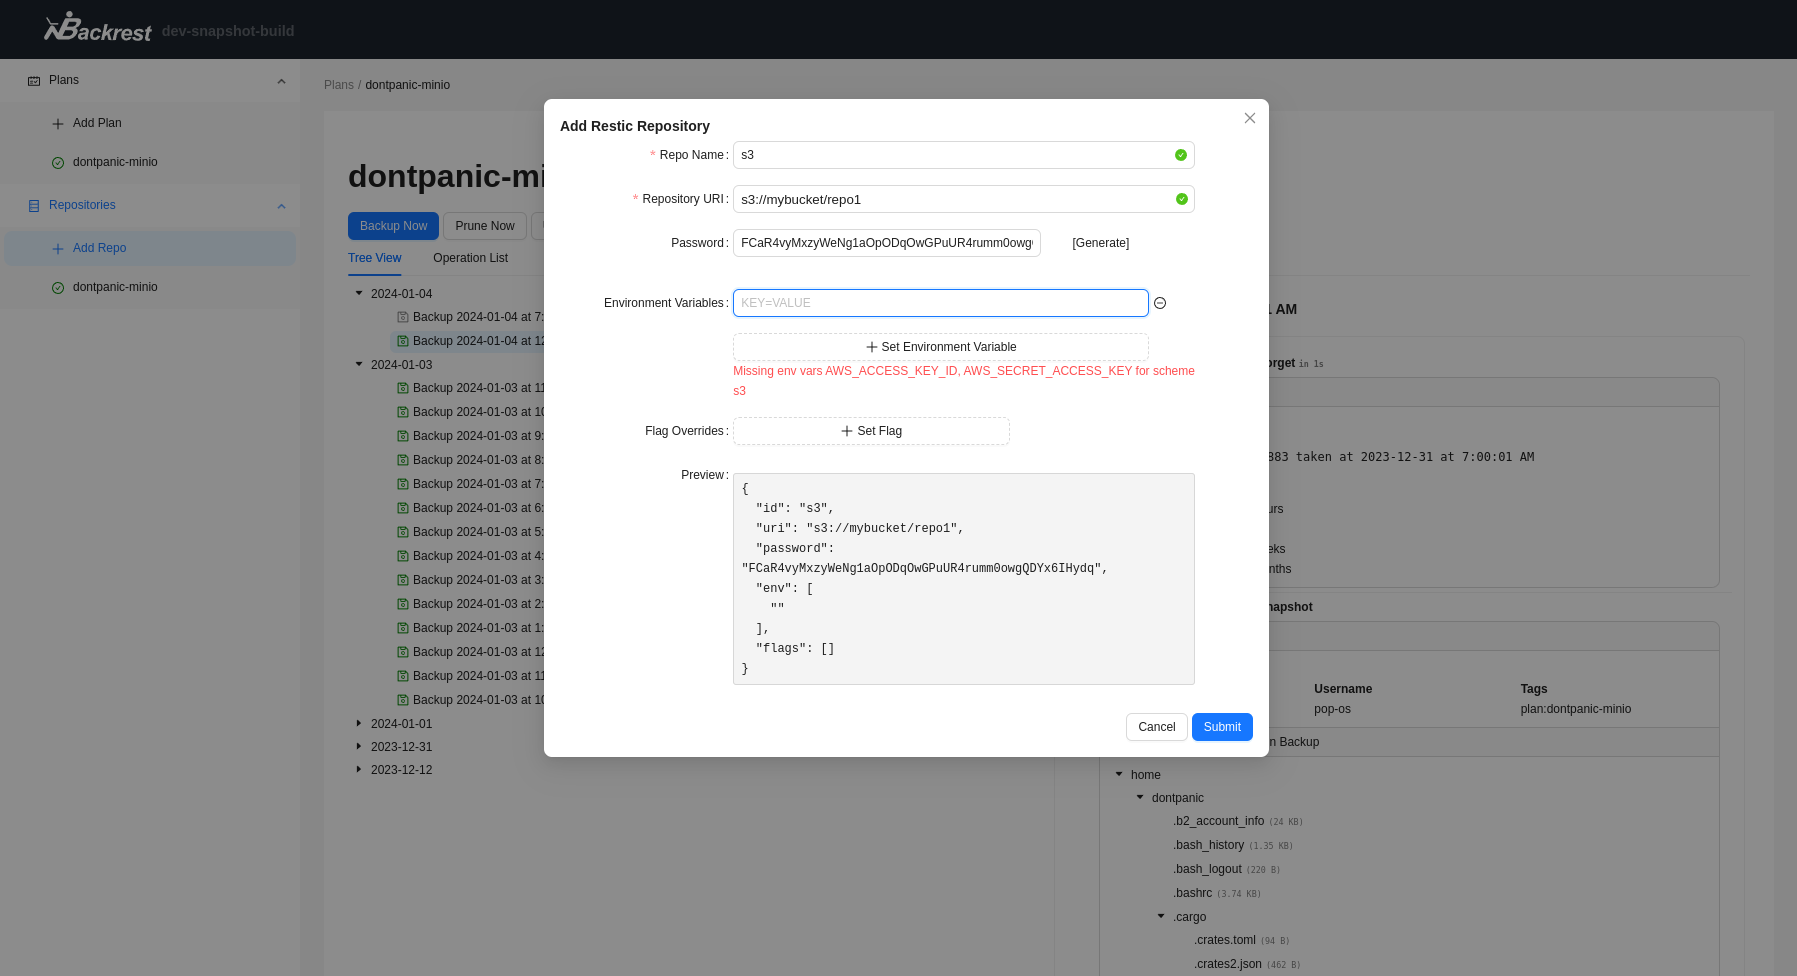
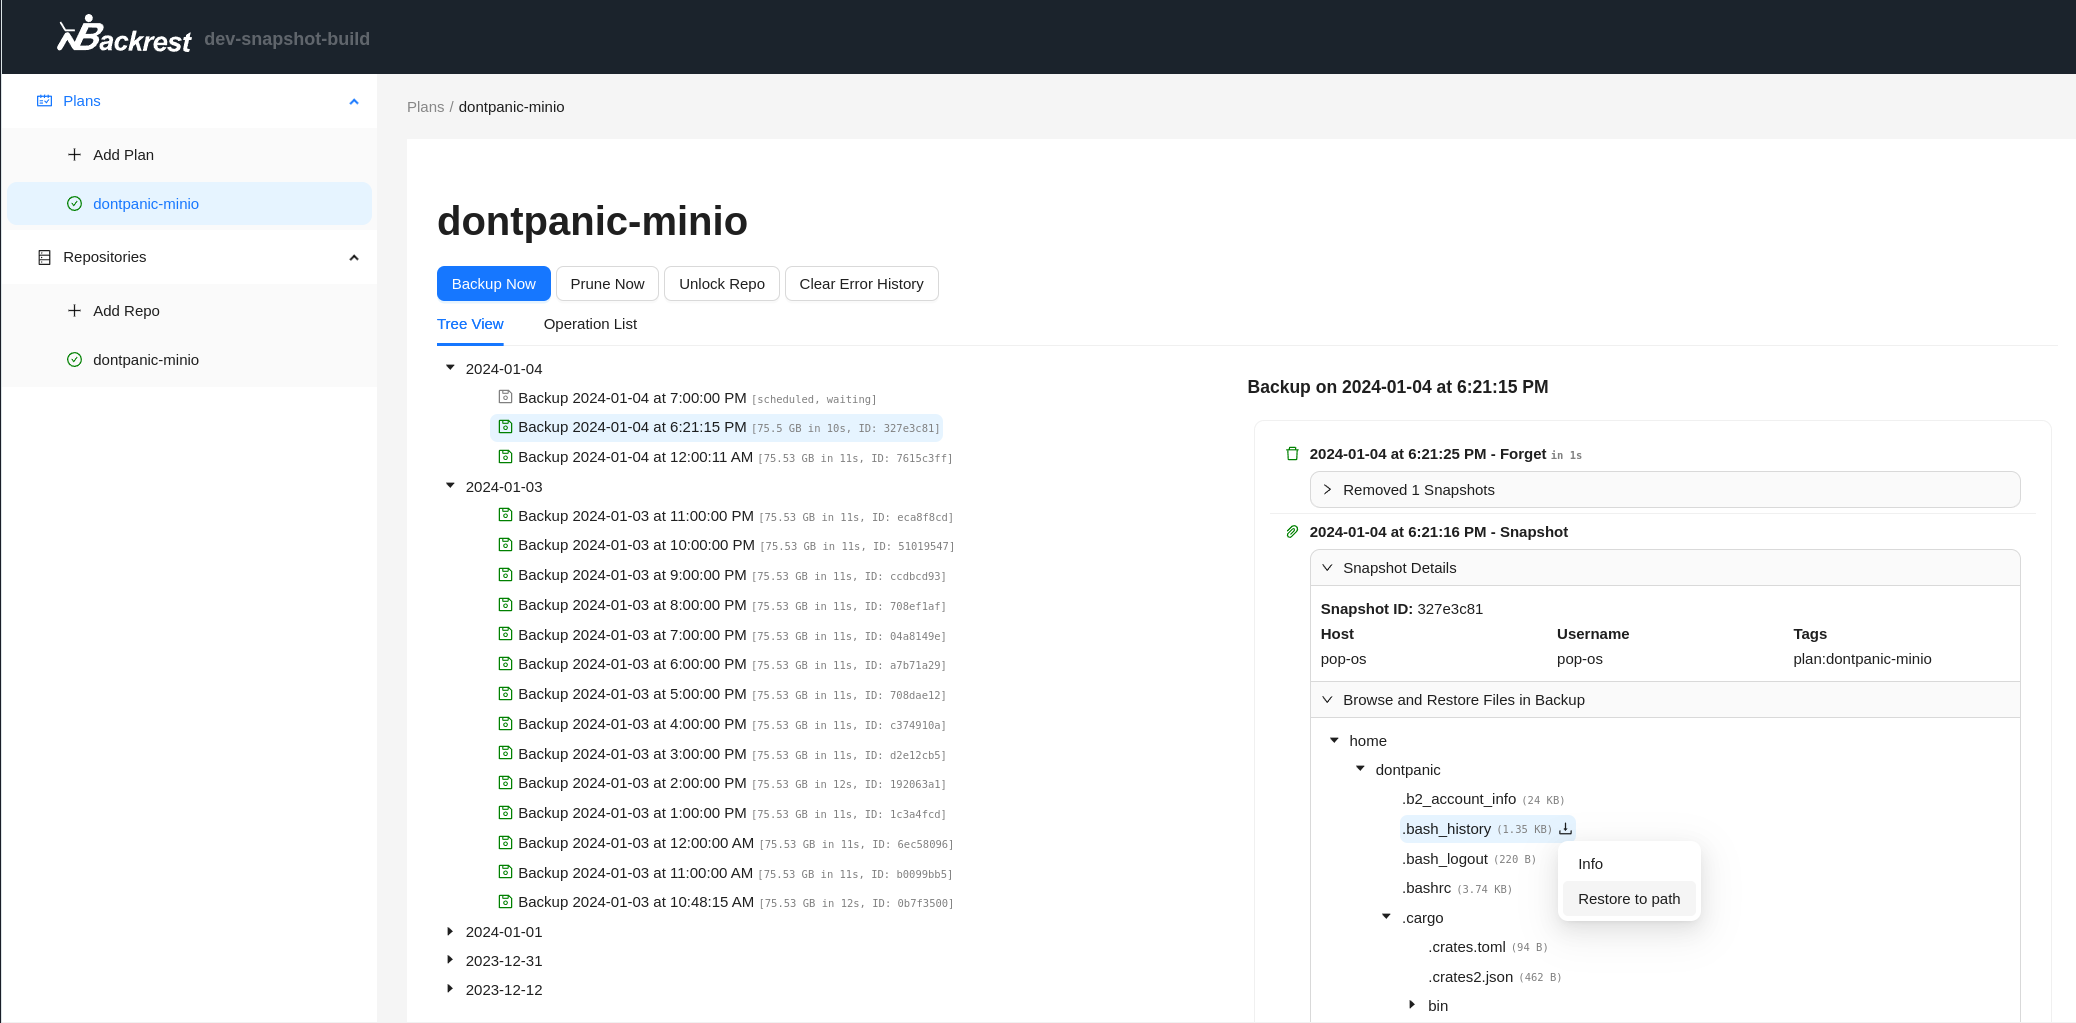
Overview
Backrest is a web-accessible backup solution built on top of restic. Backrest provides a WebUI which wraps the restic CLI and makes it easy to create repos, browse snapshots, and restore files. Additionally, Backrest can run in the background and take an opinionated approach to scheduling snapshots and orchestrating repo health operations.
By building on restic, Backrest leverages restic's mature feature set. Restic provides fast, reliable, and secure backup operations.
Backrest itself is built in Golang (matching restic's implementation) and is shipped as a self-contained and light weight binary with no dependecies other than restic. This project aims to be the easiest way to setup and get started with backups on any system. You can expect to be able to perform all operations from the web interface but should you ever need more control, you are free to browse your repo and perform operations using the restic cli. Additionally, Backrest can safely detect and import your existing snapshots (or externally created snapshots on an ongoing basis).
Preview
Platform Support
- Docker
- Linux
- MacOS
- Windows
- FreeBSD
Features
- WebUI for restic supports local and remote access (e.g. run on a NAS and access from your desktop)
- Realtime UI e.g. live progress bars for backup operations and live refreshes of operation history.
- Snapshot browser
- Restore interface
- Configurable backup plans
- Cronexprs provide flexible scheduling options
- Configurable retention policies with restic forget (e.g. keep 1 snapshot per day for 30 days, 1 snapshot per week for 6 months, etc)
- Include lists
- Exclusion lists
- Add custom CLI flags for detailed control of restic e.g. for use with rclone
- Supported destinations are any restic supported repository (e.g. local filesystem, S3, Backblaze, rclone, etc).
- Automatic repo health operations e.g. forget and prune.
- Forget runs after every backup.
- Prune once every 7 days by default.
- Multiple backup plans can be configured running on different schedules and with different retention policies.
- Multiple restic repositories can be configured and used in different plans.
- Event hooks for notifications
- Lifecycle hooks are triggered with status information from operations backrest runs on your behalf.
- Supported services: Discord, Gotify, Shell Command
- Events: Backup Start, Backup Finish, Backup Error, Any Error
- Multi-user authentication: backrest can be secured with a username and password.
User Guide
Installation
Backrest is packaged as a single executable. It can be run directly on Linux, MacOS, and Windows. restic will be downloaded and installed in the data directory on first run.
Download options
- Download and run a release from the releases page.
- Build from source (see below).
- Run with docker:
garethgeorge/backrest:latest(see on dockerhub) orgarethgeorge/backrest:latest-alpinefor an image that includes rclone and common unix utilities.
Backrest is accessible from a web browser. By default it binds to 0.0.0.0:9898 and can be accessed at http://localhost:9898. Change the port with the BACKREST_PORT environment variable e.g. BACKREST_PORT=127.0.0.1 backrest to listen only on local interfaces. On first startup backrest will prompt you to create a default username and password, this can be changed later in the settings page.
Note: backrest installs a specific restic version to ensure that the version of restic matches the version backrest is tested against. This provides the best guarantees for stability. If you wish to use a different version of restic OR if you would prefer to install restic manually you may do so by setting the BACKREST_RESTIC_COMMAND environment variable to the path of the restic binary you wish to use.
Running with Docker Compose
Docker image: https://hub.docker.com/r/garethgeorge/backrest
Example compose file:
version: "3.2"
services:
  backrest:
    image: garethgeorge/backrest
    container_name: backrest
    hostname: backrest #Use this to set the hostname instead of container ID to the config.json and WebUI.
    volumes:
      - ./backrest/data:/data
      - ./backrest/config:/config
      - ./backrest/cache:/cache
      - /MY-BACKUP-DATA:/userdata # mount your directories to backup somewhere in the filesystem
      - /MY-REPOS:/repos # (optional) mount your restic repositories somewhere in the filesystem.
    environment:
      - BACKREST_DATA=/data # path for backrest data. restic binary and the database are placed here.
      - BACKREST_CONFIG=/config/config.json # path for the backrest config file.
      - XDG_CACHE_HOME=/cache # path for the restic cache which greatly improves performance.
    restart: unless-stopped
    ports:
      - 9898:9898
Running on Linux
Arch Linux
Note: Backrest on AUR is not maintained by the backrest official and has made minor adjustments to the recommended services. Please refer to here for details. In backrest@.service, use
resticfrom the Arch Linux official repository by settingBACKREST_RESTIC_COMMAND. And for information on enable/starting/stopping services, please refer to Systemd#Using_units.
## install backrest from AUR
paru -Sy backrest  # or: yay -Sy backrest

## enable backrest service for current user
sudo systemctl enable --now backrest@$USER.service
Download release
Download a release from the releases page
Using systemd with the install script (Recommended)
Extract the release you downloaded and run the install script:
# extract the release to a subfolder of the current directory
mkdir backrest && tar -xzvf backrest_Linux_x86_64.tar.gz -C backrest
# run the install script
cd backrest && ./install.sh
The install script will:
- Move the backrest binary to
/usr/local/bin - Create a systemd service file at
/etc/systemd/system/backrest.service - Enable and start the service
Read the script before running it to make sure you are comfortable with these operations.
Run on startup with cron (Basic)
Move the backrest binary to /usr/local/bin:
sudo mv backrest /usr/local/bin/backrest
Add the following line to your crontab (e.g. crontab -e):
@reboot /usr/local/bin/backrest
Run on startup with systemd manually
sudo mv backrest /usr/local/bin/backrest
Create a systemd service file at /etc/systemd/system/backrest.service with the following contents:
[Unit]
Description=ResticWeb
After=network.target

[Service]
Type=simple
User=<your linux user>
Group=<your linux group>
ExecStart=/usr/local/bin/backrest
Environment="BACKREST_PORT=127.0.0.1:9898"

[Install]
WantedBy=multi-user.target
Then run the following commands to enable and start the service:
sudo systemctl enable backrest
sudo systemctl start backrest
Note: you can set the linux user and group to your primary user (e.g. whoami when logged in).
Running on MacOS
Using Brew (Recommended)
Backrest is provided as a homebrew tap. To install with brew run:
brew tap garethgeorge/homebrew-backrest-tap
brew install backrest
This tap uses Brew services to launch and manage Backrest's lifecycle. Backrest will launch on startup and run on port ':9898` by default.
Manually using the install script (Recommended)
Download a Darwin release from the releases page and install it to /usr/local/bin.
Extract the release you downloaded and run the install script:
# extract the release to a subfolder of the current directory
mkdir backrest && tar -xzvf backrest_Darwin_arm64.tar.gz -C backrest
# run the install script
cd backrest && ./install.sh
The install script will:
- Move the backrest binary to
/usr/local/bin - Create a launch agent file at
~/Library/LaunchAgents/com.backrest.plist - Load the launch agent
Read the script before running it to make sure you are comfortable with these operations.
Manually
If setting up backrest manually it's recommended to install the binary to /usr/local/bin and run it manually. You can also create a launch agent to run it on startup or may run it manually when needed.
Running on Windows
Download a Windows release from the releases page and install it to C:\Program Files\Backrest\backrest.exe (create the path if it does not exist). The binary should be run as administrator on first launch, otherwise the restic installation will fail and the process will terminate.
To run the binary on login, create a shortcut to the binary and place it in the shell:startup folder. See this windows support article for more details.
warning: If you get filesystem errors you may need to run Backrest as administrator for full filesystem access.
warning: Backrest is not tested on Windows to the same bar as Linux and MacOS. Some features may not work as expected.
Configuration
Environment Variables
BACKREST_PORT- the port to bind to. Defaults to 9898.BACKREST_CONFIG- the path to the config file. Defaults to$HOME/.config/backrest/config.jsonor if$XDG_CONFIG_HOMEis set,$XDG_CONFIG_HOME/backrest/config.json.BACKREST_DATA- the path to the data directory. Defaults to$HOME/.local/share/backrestor if$XDG_DATA_HOMEis set,$XDG_DATA_HOME/backrest.BACKREST_RESTIC_COMMAND- the path to the restic binary. Defaults managed version of restic which will be downloaded and installed in the data directory.XDG_CACHE_HOME-- the path to the cache directory. This is propagated to restic.
 Documentation
Documentation

There is no documentation for this package.