 README
README
Sunny5 evcc
![]()


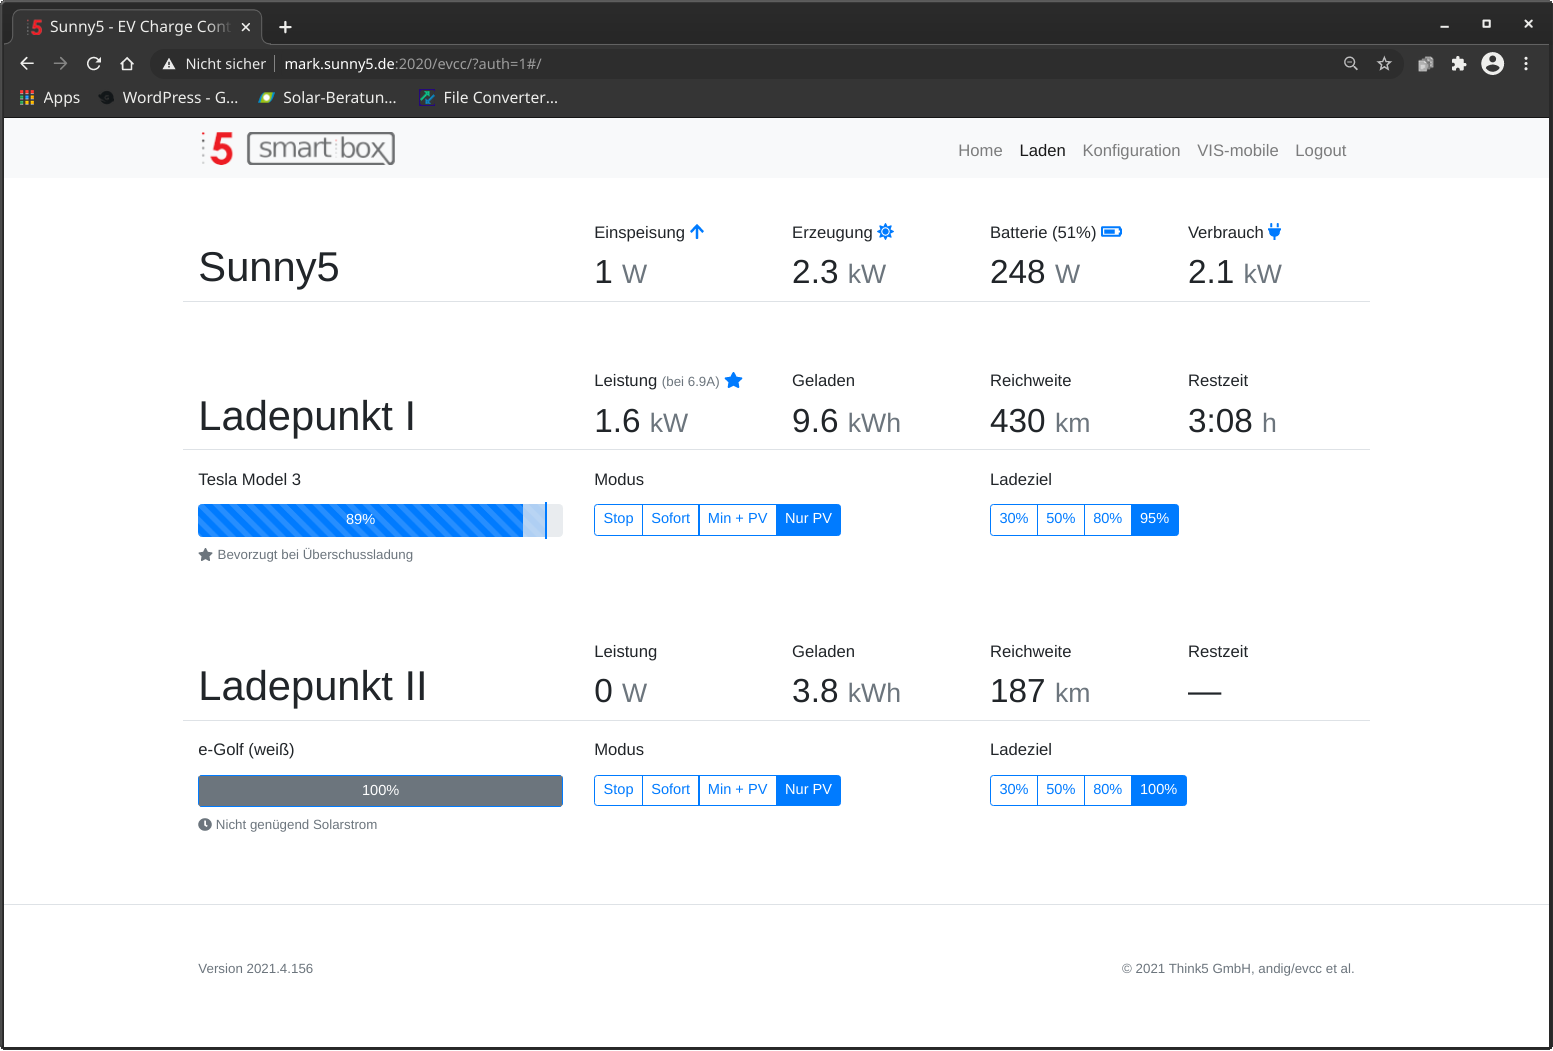
EVCC is an extensible EV Charge Controller with PV integration implemented in Go. It supports integration with Sunny5 Hybrid-Inverters and Pylontech battery storage. This charge controller is Open Source, derived from andig/evcc, with enhancements and features for load management and load limitation on multiple loadpoints.
This project is part of Sunny5 Smartbox, a complete hard- and software solution running locally for smarthome and wallbox management, ready to go with remote access and based on open standards.
| Sunny5 Smartbox in action with two loadpoints |
|---|
 |
| Mobile ioBroker view | Mobile EVCC view |
|---|---|
 |
 |
What's new?
- Added go-eCharger support for hardware v3 and api v2 with 1p3p switching. New MQTT setter to adjust activePhases. Peform 1-phase switching when charging in PV mode; set 3-phase when doing quick immediate charging.
- Added obd2evcc: This addon reads soc and range of vehicles by using elm327 obd dongles with high flying wifi chipset. Obd2evcc reads data right from the vehicle can bus, query and reconnect dongles when they are in wifi range at home and pushes all data to mqtt for use with evcc. It needs no internet or vehicle cloud api, data is updated locally every second. Obd2evcc contains a config tool for vehicle selection and comes with multiple dongle support, see readme.txt in obd2evcc folder. Grab obd2evcc standalone:
svn export https://github.com/mark-sch/evcc/trunk/obd2evcc obd2evccSee list of supported vehicles - Added support for simple grid inverters with pv meter only - grid and consumption meters are calculated and displayed.
- Load management with multiple loadpoints: e.g. press pv mode twice to set a charge priority
- Load limitation feature on site level: e.g. multiple loadpoints can share a single 16A grid connection.
- New contactor wellness feature. Purpose: Minimize contactor switching on ev batteries by avoiding unnecessary charger turn offs on low pv power. This feature also avoids that many ev's are falling asleep after a certain amount of turn on/offs. A turn off delay will by dynamically calculated based on the houshold battery soc.
- Show more details of the system state in the Gui: "Home battery has priority over ev", "Enable/disable delay of charging process", "Immediate charging to minSoc treshold" and so on.
- Backend enhancement to support login and user permissions (when using Sunny5 Smartbox)
- Extended MQTT getter/setter for smarthome integration
- Gui: Release Tesla charge port when stopping the charge process in the gui - if a configured Tesla is connected and detected
- Gui: window toast message throttling
- Show charging current in GUI
- Distinguish between foreign and configured vehicles, e.g. switch foreign ev's after connect to mode stop and switch to pv mode when the own vehicle is connected.
- Measure and display houshold consumption metering in evcc GUI
evcc Features
- Responsive user interface, for mobile, tablet and large screens
- Wide range of hardware support
- chargers: e.g. Wallbe, go-eCharger, SimpleEVSE, EVSEWifi, KEBA/BMW, openWB, Fritz!DECT, Tasmota and TP-Link outlets and many more ...
- meters: ModBus (Eastron SDM, MPM3PM, SBC ALE3 and many more), Discovergy, SMA Sunny Home Manager, KOSTAL Smart Energy Meter (KSEM, EMxx), any Sunspec-compatible inverter or home battery devices (Fronius, SMA, SolarEdge, KOSTAL, STECA, E3DC, ...), Tesla PowerWall
- electric vehicles communication interfaces: Audi, BMW, Ford, Hyundai, Kia, Nissan, Niu, Porsche, Renault, Seat, Skoda, Tesla, Volkswagen, Volvo and growing
- plugins for integrating with hardware devices and home automation: Modbus (meters and grid inverters), HTTP, MQTT, Javascript, WebSockets and shell scripts
- Status notifications using Telegram or PushOver messaging
- Logging using InfluxDB and Grafana
- Granular charge power control down to 25W steps with supported chargers
- Exposes data and functionality by REST API and MQTT
Index
Getting started
-
Install EVCC. For details see installation.
-
Copy the default configuration file
evcc.sunny5.yamltoevcc.yamland open for editing. We recommend to use an editor like VS Code with the YAML extension for syntax highlighting. -
To create a minimal setup you need a meter (either grid meter or pv generation meter) and a supported charger. Many PV inverters contain meters that can be used here.
-
Configure both meter(s) and charger by:
- choosing the appropriate
type - add a
nameattribute than can later be referred to - add configuration details depending on
type
See
evcc.sunny5.yamlfor examples. - choosing the appropriate
-
Configure an optional vehicle by choosing the appropriate
typeand adding anameattribute than can later be referred to. -
Test your meter, charger and optional vehicle configuration by running
evcc meter|charger|vehicle -
Configure the
siteand assign the grid- or PV meter using the definednameattributes. -
Configure a
loadpointand assign the charge meter, charger and vehicle using the definednameattributes. -
Provide optional configuration for MQTT, push messaging, database logging and more.
Installation
EVCC is provided as binary executable file and docker image. Download the file for your platform and then execute like this:
evcc -h
Use the following systemd unit description to configure EVCC as service (put into /etc/systemd/system/evcc.service):
[Unit]
Description=evcc
Wants=network-online.target
After=syslog.target network.target network-online.target mosquitto.service
[Service]
ExecStartPre=rm /tmp/evcc -f
ExecStart=/home/sunny5/git/evcc/evcc
WorkingDirectory=/home/sunny5/git/evcc
Restart=always
User=sunny5
RestartSec=1000ms
TimeoutSec=180
[Install]
WantedBy=multi-user.target
EVCC can also be run using Docker. Here's and example with given config file and UI on port 7070:
docker run -v $(pwd)/evcc.sunny5.yaml:/etc/evcc.yaml -p 7070:7070 think5/evcc -h
If using Docker with a meter or charger that requires UDP like KEBA, make sure that the Docker container can receive UDP messages on the relevant ports (:7090 for KEBA):
docker run -p 7070:7070 -p 7090:7090/udp think5/evcc ...
When using Docker with a device that requires multicast UDP like SMA, make sure that the Docker container uses the network_mode: host configuration:
docker run --network host think5/evcc ...
To build EVCC from source, Go 1.16 and Node 14 are required:
make
Prerequisites: mosquitto and mosquitto-clients packages for mqtt and influxdb for db support. sudo apt install influxdb influxdb-client mosquitto mosquitto-clients. Run influx cli and type: create database evcc
Note: EVCC comes without any guarantee. You are using this software entirely at your own risk. It is your responsibility to verify it is working as intended. EVCC requires a supported charger and a combination of grid, PV and charge meter. All components must be installed by a certified professional.
Configuration
The EVCC consists of five basic elements: Site and Loadpoints describe the infrastructure and combine Chargers, Meters and Vehicles.
Site
A site describes the grid connection and is responsible for managing the available power. A minimal site configuration requires a grid meter for managing EVU demand and optionally a PV or battery meter.
site:
- title: Zuhause # display name for UI
  meters:
    grid: sdm630 # grid meter reference
    pv: sma # pv meter reference
Loadpoint
Loadpoints combine meters, charger and vehicle together and add optional configuration. A minimal loadpoint configuration requires a charger and optionally a separate charge meter. If charger has an integrated meter it will automatically be used:
loadpoints:
- title: Garage # display name for UI
  charger: wallbe # charger reference
  vehicle: audi # vehicle reference
  meters:
    charge: sdm630 # grid meter reference
More options are documented in the evcc.dist.yaml sample configuration.
Charge modes
The default charge mode upon start of EVCC is configured on the loadpoint. Multiple charge modes are supported:
- Off: disable the charger, even if car gets connected.
- Now (Sofortladen): charge immediately with maximum allowed current.
- Min + PV: charge immediately with minimum configured current. Additionally use PV if available.
- PV: use PV as available. May not charge at all or may interrupt charging if PV production is too low or other consuption is too high.
In general, due to the minimum value of 5% for signalling the EV duty cycle, the charger cannot limit the current to below 6A. If the available power calculation demands a limit less than 6A, handling depends on the charge mode. In PV mode, the charger will be disabled until available PV power supports charging with at least 6A. In Min + PV mode, charging will continue at minimum current of 6A and charge current will be raised as PV power becomes available again. Min + PV mode may behave different, when used with HEMS (SHM). Please note that not all vehicles support charging with very low current limits at all or only under special circumstances. For these type of vehicles the minimum allowed charge current needs to be raised.
Charger
Charger is responsible for handling EV state and adjusting charge current. Available charger implementations are:
evsewifi: chargers with SimpleEVSE controllers using EVSE-WiFigo-e: go-eCharger chargers (both local and cloud API are supported, at least firmware 040.0 required)keba: KEBA KeContact P20/P30 and BMW chargers (see Preparation)mcc: Mobile Charger Connect devices (Audi, Bentley, Porsche)nrgkick-bluetooth: NRGkick chargers with Bluetooth connector (Linux only, not supported on Docker)nrgkick-connect: NRGkick chargers with additional NRGkick Connect moduleopenWB: openWB chargers using openWB's MQTT interfacephoenix-em-eth: chargers with Phoenix EM-CP-PP-ETH controllersphoenix-ev-eth: chargers with Phoenix EV-CC-***-ETH controllers (see Preparation)phoenix-ev-ser: chargers with Phoenix EV-CC-***-SER serial controllers (Modbus RTU)simpleevse: chargers with SimpleEVSE controllers connected via ModBus (e.g. OpenWB Wallbox, Easy Wallbox B163, ...)wallbe: Wallbe Eco chargers (see Preparation). For older Wallbe boxes (pre 2019) with Phoenix EV-CC-AC1-M3-CBC-RCM-ETH controllers make sure to setlegacy: trueto enable correct current configuration.warp: Tinkerforge Warp/ Warp Pro chargerfritzdect: pseudo charger using Fritz!DECT 200/210 outletstasmota: pseudo charger using Tasmota outletstplink: pseudo charger using TP-Link HS110 outletsdefault: default charger implementation using configurable plugins for integrating any type of charger
Configuration examples are documented at andig/evcc-config#chargers
KEBA preparation
KEBA chargers require UDP function to be enabled with DIP 1.3 = ON, see KEBA installation manual.
Phoenix EM/EV ethernet controller preparation
The EM/EV ethernet controllers requires DIP 10 = ON be controlled by ModBus, see controller manual.
Wallbe preparation
Wallbe chargers are supported out of the box. The Wallbe must be connected using Ethernet. If not configured, the default address 192.168.0.8:502 is used.
To allow controlling charge start/stop, the Wallbe physical configuration must be modified. This requires opening the Wallbe. Once opened, DIP 10 must be set to ON:

More information on interacting with Wallbe chargers can be found at GoingElectric. Use with care.
NOTE: The Wallbe products come in two flavors. Older models (2017 known to be "old", 2019 known to be "new") use the Phoenix EV-CC-AC1-M3-CBC-RCM controller. For such models make sure to set legacy: true. You can find you which one you have using MBMD:
mbmd read -a 192.168.0.8:502 -d 255 -t holding -e int 300 1
Compare the value to what you see as Actual Charge Current Setting in the Wallbe web UI. If the numbers match, it's a Phoenix controller, if the reading is factor 10x the UI value then it's a Wallbe controller.
NOTE: Opening the wall box must only be done by certified professionals. The box must be disconnected from mains before opening.
Meter
Meters provide data about power and energy consumption, PV production or battery utilization. A meter defines a point of power delivery and can be an actual physical meter (e.g. a grid meter), a PV inverter (AC or even DC power in case of hybrid inverters), or a home battery.
Chargers may also contain internal or attached meters. If the charger contains an internal meter, there's no need to configure the charge meter separately. If no charge meter is configured, EVCC will use the charger-attached meter (if exists) or assume the configured charger power as meter value.
EVCC uses positive (+) sign for incoming energy (grid consumption, PV inverter production or home battery discharge) and negative (-) sign for outgoing energy (grid feed-in, PV inverter remaining usage or home battery charge). All remaining home power usage, including the charger, is always of positive (+) sign.
Available meter implementations are:
modbus: ModBus meters as supported by MBMD. Configuration is similar to the ModBus plugin wherepowerandenergyspecify the MBMD measurement value to use. Additionally,soccan specify an MBMD measurement value for home battery soc. Typical values arepower: Power,energy: Sumandsoc: ChargeStatewhere onlypowerapplied per default.openwb: OpenWB meters. Useusageto choose meter type:grid/pv/battery.sma: SMA Home Manager 2.0 and SMA Energy Meter. Power reading is configured out of the box but can be customized if necessary. To obtain specific energy readings define the desired Obis code (Import Energy: "1:1.8.0", Export Energy: "1:2.8.0").tesla: Tesla PowerWall meter. Useusageto choose meter type:grid/pv/battery.default: default meter implementation where meter readings-power,energy, per-phasecurrentsand batterysocare configured using plugins
Configuration examples are documented at andig/evcc-config#meters
Vehicle
Vehicle represents a specific EV vehicle and its battery. If vehicle is configured and assigned to the charger, charge status and remaining charge duration become available in the user interface.
Available vehicle remote interface implementations are:
audi: Audi (eTron, Q55)bmw: BMW (i3)citroen,opel,peugeot: Follow this tutorial to obtain client credentials for PSA.ford: Ford (Kuga, Mustang)kia: Kia (Bluelink vehicles like Soul 2019)hyundai: Hyundai (Bluelink vehicles like Kona or Ioniq)nissan: Nissan (Leaf)niu: Niu Scootertesla: Tesla (any model)renault: Renault (all ZE models: Zoe, Twingo Electric, Master, Kangoo)porsche: Porsche (Taycan)seat: Seat (Cupra, Mii)skoda: Skoda (Citygo, Enyaq)vw: Volkswagen (eGolf, eUp)id: Volkswagen (ID.3, ID.4)volvo: Volvodefault: default vehicle implementation using configurable plugins for integrating any type of vehicle
Configuration examples are documented at andig/evcc-config#vehicles
Home Energy Management System
EVCC can integrate itself with Home Energy Management Systems. At this time, the SMA Home Manager (SHM) is the only supported system. To enable add
hems:
  type: sma
  allowcontrol: false # set true to allow SHM controlling charger in PV modes
to the configuration. The EVCC loadpoints can then be added to the SHM configuration. When SHM is used, the ratio of Grid to PV Power for the Min+PV mode can be adjusted in Sunny-Portal via the "Optional energy demand" slider. When the amount of configured PV is not available, charging suspends like in PV mode. So, pushing the slider completely to the left makes Min+PV behave as described above. Pushing completely to the right makes Min+PV mode behave like PV mode.
Plugins
Plugins are used to integrate various devices and external data sources with EVCC. Plugins can be used in combination with a default type meter, charger or vehicle.
Plugins support both read and write access. When using plugins for write access, the actual data is provided as variable in form of ${var[:format]}. If format is omitted, data is formatted according to the default Go %v format. The variable is replaced with the actual data before the plugin is executed.
Modbus (read/write)
The modbus plugin is able to read data from any Modbus meter or SunSpec-compatible solar inverter. Many meters are already pre-configured (see MBMD Supported Devices). It also supports writing Modbus registers for integration of additional chargers.
The meter configuration consists of the actual physical connection and the value to be read.
Physical connection
If the device is physically connected using an RS485 adapter, device and serial configuration baudrate, comset must be specified:
type: modbus
device: /dev/ttyUSB0
baudrate: 9600
comset: "8N1"
If the device is a grid inverter or a Modbus meter connected via TCP, uri must be specified:
type: modbus
uri: 192.168.0.11:502
id: 1 # modbus slave id
If the device is a Modbus RTU device connected using an RS485/Ethernet adapter, set rtu: true. The serial configuration must be done directly on the adapter. Example:
type: modbus
uri: 192.168.0.10:502
id: 3 # modbus slave id
rtu: true
Logical connection
The meter device type meter and the device's slave id id are always required:
type: ...
uri/device/id: ...
model: sdm
value: Power
scale: -1 # floating point factor applied to result, e.g. for kW to W conversion
Supported meter models are the same as supported by MBMD:
- RTU:
ABBABB A/B-Series metersMPMBernecker Engineering MPM3PM metersDZGDZG Metering GmbH DVH4013 metersINEPROInepro Metering Pro 380JANITZAJanitza B-Series metersSBCSaia Burgess Controls ALD1 and ALE3 metersSDMEastron SDM630SDM220Eastron SDM220SDM230Eastron SDM230SDM72Eastron SDM72ORNO1PORNO WE-514 & WE-515ORNO3PORNO WE-516 & WE-517
- TCP: Sunspec-compatible grid inverters (SMA, SolarEdge, Kaco, KOSTAL, Fronius, Steca etc)
Use value to define the value to read from the device. All values that are supported by MBMD are pre-configured.
In case of SunSpec-compatible inverters, values can also be configured in the form of model:[block:]point according to SunSpec definition. For example, a 3-phase inverter's DC power of the 2nd string would be configurable as 103:2:W.
Manual configuration
If the Modbus device is not supported by MBMD, the Modbus register can also be manually configured:
type: ...
uri/device/id: ...
register:
  address: 40070
  type: holding # holding or input
  decode: int32 # int16|32|64, uint16|32|64, float32|64 and u|int32s + float32s
scale: -1 # floating point factor applied to result, e.g. for kW to W conversion
The int32s/uint32s decodings apply swapped word order and are useful e.g. with E3/DC devices.
To write a register use type: writesingle which writes a single 16bit register (either int or bool). The encoding is always uint16 in this case.
MQTT (read/write)
The mqtt plugin allows to read values from MQTT topics. This is particularly useful for meters, e.g. when meter data is already available on MQTT. See MBMD for an example how to get Modbus meter data into MQTT.
Sample configuration:
type: mqtt
topic: mbmd/sdm1-1/Power
timeout: 30s # don't accept values older than timeout
scale: 0.001 # floating point factor applied to result, e.g. for Wh to kWh conversion
Sample write configuration:
type: mqtt
topic: mbmd/charger/maxcurrent
payload: ${var:%d}
For write access, the data is provided using the payload attribute. If payload is missing, the value will be written in default format.
HTTP (read/write)
The http plugin executes HTTP requests to read or update data. Includes the ability to read and parse JSON using jq-like queries for REST apis.
Sample read configuration:
type: http
uri: https://volkszaehler/api/data/<uuid>.json?from=now
method: GET # default HTTP method
headers:
- content-type: application/json
auth: # basic authorization
  type: basic
  user: foo
  password: bar
insecure: false # set to true to trust self-signed certificates
jq: .data.tuples[0][1] # parse response json
scale: 0.001 # floating point factor applied to result, e.g. for kW to W conversion
Sample write configuration:
body: %v # only applicable for PUT or POST requests
Websocket (read only)
The websocket plugin implements a web socket listener. Includes the ability to read and parse JSON using jq-like queries. It can for example be used to receive messages from Volkszähler's push server.
Sample configuration (read only):
type: http
uri: ws://<volkszaehler host:port>/socket
jq: .data | select(.uuid=="<uuid>") .tuples[0][1] # parse message json
scale: 0.001 # floating point factor applied to result, e.g. for Wh to kWh conversion
timeout: 30s # error if no update received in 30 seconds
Javascript (read/write)
EVCC includes a bundled Javascript interpreter with Underscore.js library installed. The js plugin is able to execute Javascript code from the script tag. Useful for quick prototyping:
type: js
script: |
  var res = 500;
  2 * res; // returns 1000
When using the js plugin for writing, the value to write is handed to the script as pre-populated variable:
charger:
- type: generic
  maxcurrent:
    type: js
    script: |
      console.log(maxcurrent);
Shell Script (read/write)
The script plugin executes external scripts to read or update data. This plugin is useful to implement any type of external functionality.
Sample read configuration:
type: script
cmd: /bin/bash -c "cat /dev/urandom"
timeout: 5s
Sample write configuration:
type: script
cmd: /home/user/my-script.sh ${enable:%b} # format boolean enable as 0/1
timeout: 5s
Calc (read only)
The calc plugin allows calculating the sum of other plugins:
type: calc
add:
- type: ...
  ...
- type: ...
  ...
The calc plugin is useful e.g. to combine power values if import and export power are separate like with S0 meters. Use scale: -1 on one of the elements to implement a subtraction or scale: 1000 to implement Wh to kWh conversion.
Combined status (read only)
The combined status plugin is used to convert a mixed boolean status of plugged/charging into an EVCC-compatible charger status of A..F. It is typically used together with OpenWB MQTT integration.
Sample configuration (read only):
type: combined
plugged:
  type: mqtt
  topic: openWB/lp/1/boolPlugStat
charging:
  type: mqtt
  topic: openWB/lp/1/boolChargeStat
API
EVCC provides a REST and MQTT APIs.
REST API
/api/state: EVCC state (static configuration and dynamic state)/api/loadpoints/<id>/mode: loadpoint charge mode (writable)/api/loadpoints/<id>/targetsoc: loadpoint target SoC (writable)
Note: to modify writable settings perform a POST request appending the value as path segment.
MQTT API
The MQTT API follows the REST API's structure, with loadpoint ids starting at 0:
evcc: root topicevcc/updated: timestamp of last updateevcc/site: site dynamic stateevcc/site/prioritySoC: battery priority SoC (writable)evcc/loadpoints: number of available loadpointsevcc/loadpoints/<id>: loadpoint dynamic stateevcc/loadpoints/<id>/mode: loadpoint charge mode (writable)evcc/loadpoints/<id>/minSoC: loadpoint minimum SoC (writable)evcc/loadpoints/<id>/targetSoC: loadpoint target SoC (writable)
Note: to modify writable settings append /set to the topic for writing.
Background
EVCC is heavily inspired by OpenWB. However, in 2019, I found OpenWB's architecture slightly intimidating with everything basically global state and heavily relying on shell scripting. On the other side, especially the scripting aspect is one that contributes to OpenWB's flexibility.
Hence, for a simplified and stricter implementation of an EV charge controller, the design goals for EVCC were:
- typed language with ability for systematic testing - achieved by using Go
- structured configuration - supports YAML-based config file
- avoidance of feature bloat, simple and clean UI - utilizes Bootstrap
- containerized operation beyond Raspberry Pi - provide multi-arch Docker Image
 Documentation
Documentation

There is no documentation for this package.
 Directories
Directories
| Path | Synopsis |
|---|---|
|
internal
|
|
|
Package mock is a generated GoMock package.
|
Package mock is a generated GoMock package. |
|
soc
|
|